Take a look at your glove compartment:


This is what happens when you don't change your cabin filters for 40,000 km. Bugs, leaves and dirt is trapped, and you and your passengers will be breathing the air.

What you will need:
* cabin filters (buy HERE!)
* (-) screwdriver
* maybe a plier
* adequate lighting (torch light if installing at night)
1. Remove everything from your glove compartment.

2. Remove Left Clip:
3. Remove Right Clip
4. Remove Glove Compartment Rubber band
(a) Here it is

(b) You can't use your finger

(c) Use a screwdriver and gently remove the rubber band

5. The Glove Compartment is out


6. These are the cabin filters:

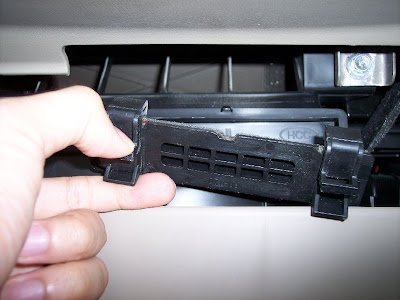
7. Remove the cabin filter cover using 2 thumbs, applying pressure downwards to remove the clips.

Cover out:

Cabin filters exposed. Only the right filter is visible.

8. Remove the Right filter by its "handle"


Pull the right filter "handle" towards you. There maybe some resistance (eg. stuck), but be gentle and try to "wiggle" out the filter.

If its really stuck, a long nose plier helps to get the job done.

Be careful not to pull too hard or risk breaking the handle.

Its out :)

The empty slot which the right filter came out of:

9. Remove the Left filter
(a) Using the "handle", slide the left filter to the RIGHT.

(b) Make sure it goes all the way to the right:

(c) Pull it out gently...

By the "handle"...

Its out! :)

10. Replace with the new cabin filters:
- The left cabin filter has a groove on the bottom right so you can differentiate them. Make sure the "handles" are FACING YOU when inserting the new filters.

Ensure that the left filter is pushed ALL THE WAY to the left, use a long screwdriver to make sure its snug in place.

11. Replace the right filter.
- You may need to use a little force and wiggle the right filter back into the casing.
- Make sure it sits back all the way in
12. Replace the Filter Cover
13. Hook up the Glove Compartment rubber band
14. Replace the Left and Right Clips
15 Test the Glove Compartment:
16. Test the air-con and feel good about the fresh air you're breathing! :)
This tutorial is dedicated to Steven Chen, who is my sifu.

12 comments:
I'm so touched....!!
Thank you Jason..
Well done!!
Wow been following your post..i think this is excellent tutorial..thanks man..
:)
What a nice post... hopefully to see more post from you, I'm an Avante owner from SG...
Thanks for dropping by Jonathan Lim.
Thanks! Great job!
You're welcomed, Mr. Alarm Clock. Hope it helped you.
Very clear! Thank you.
StevenChen
can i buy the aircon filter
from you
sms me 0138179868
chong
thx
Sorry Mr Chong, Steven Chen did a favour for us by bringing in some from SG. I don't think he does it as a job.
Finally!!! Thank you! I was trying to find this instruction. Apparently the one in the original manual was different to this but this is what I actually have in my Elantra HD!
Post a Comment